
How To Optimize Images For Good Traffic And SEO
6:30 PM Blogging Tips.
The average size of a web page has been increasing at tremendous rate over the last few years. Research carried out by HTTP Archive about few months ago, reports that the average page size has now became 1.25mb. For users with a decent broadband connection this is not a problem, but for users that still using slow dial-up connections or poor mobile data networks this poses a real issue.

Compress Your Image without loosing the quality
One of the best way to reduce the size of your web pages and increase load times is to properly re size and optimize your images. Using images that are larger than they will be displayed in your web page means that there is a lot of unnecessary data being used.Once you have resized your images there is a awesome handy tool which am recommending, like TinyPNG and TinyJPG to reduce the size of the images further. These tools work by removing unnecessary data from the images and optimizing the use of colors. These two tools are similar at their work.

|
| This is a sample picture i've compressed from 243KB to 69KB |
These sites reduces the file size of your JPEG/PNG images. Every uploaded image is analyzed to apply the best possible JPEG/PNG encoding. Based on the content of your image an optimal strategy is chosen. The result is a quality image without wasting storage or bandwidth! When you upload a JPEG?PNG file, the image is analyzed. Textures, patterns and colours are automatically identified. The encoder creates an optimally compressed JPEG/PNG file based on that information. The final result is compared with the orginal and fine-tuned. Distracting JPEG/PNG artifacts are minimized without big sacrifices in file size. Unnecessary metadata is stripped as well. You will get an optimal image, every time! JPEG/PNG is the most popular format for photos on your websites and apps. Many JPEG/PNG files do not use optimal compression, wasting valuable bytes. Balancing quality and small file size used to be a time consuming task that only humans could do. Not anymore. Let us worry about compression.
Add ALT Tag For every Images that you upload
As everyone knows Alt Tag is very important in Blog posts, because it is improve your Traffic and increase your site ranking.When you Write Some post in blog and you are uploading any pic in your blog then it'll be very useful. if you want to improve you ranking and traffic then it is one of the best recommended method. If anyone uses Google images search according to your some topic then your blog post image will appear.if you are using Alt and Title tags, it can bring a lot of traffic from Google Image Search.
for setting up the ALT tag please follow these steps:-

1.Click on "insert Image" for uploading the desired images.
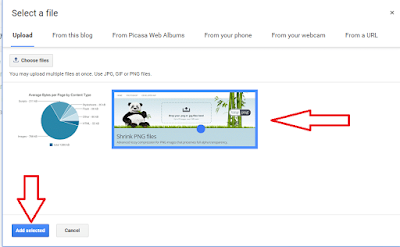
2. After uploading the images, click on the images that you want to insert to a particular area of your article. and click on "add selected" to insert it into the article.

3. click on the inserted picture, then a new bar will open and click on "properties"

4. A new box will open and fill up the Title text and ALT text according to your article name/content. As i'm shows in the picture above.
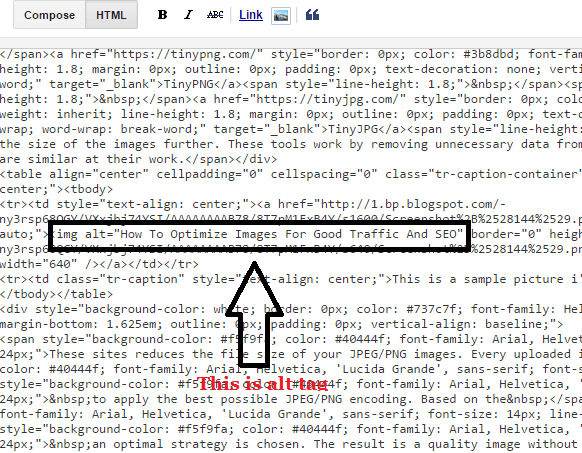
5.Then double check the ALT tag by clicking on HTML tab. it is clearly shows that,it is placed on HTML version of the article exactly same as i've given in the 4th step.
This 5 step guide is better for SEO and it will also boost your site traffic.
it also helps to get better ranking in google searches.
In This post we've covered about How To Optimize Images For Good Traffic And SEO, with a compression tool and ATL tag Insertion.
0 Komentar