
How to create blogspot Blog In Blogger
7:40 PM Blogging Tips.

There are 4 platforms where you can create a freeblog. such as
1- blogspot.com
2- wordpress.com
3- Tumbler.com
4- webs.com
Here you will get a subdomain name. Such as yoursite.blogspot.com or yoursite.wordpress.comand its hosting is free. However if you want a domain name, such as yoursite.com
then you have to spend some money to purchase your own domain and monthly some hosting fee. eg- if you want to purchase yoursite.com from godaddy then you have to spend $10 for one year and every month some hosting fee like $7 from hostgattor.
so, if you can not afford for a domain name and hosting fee, then choose to create free blog in blogspot.com and later you can purchase a domain and blogspot has an option to redirect your blog through your custom domain and its hosting is free.
so, lets start how to create a free blog in blogspot.com. It is really easy to create a blog in blogspot.com. It is completely free service. So, before i am going to show you the step by step method how to create a blog and how to write an article with keywords, i want to tell that i am not a expert blogtech, or any kind of seo expert. But i know the simple things which has worked for me and i hope it will also work for you. Most of my way of money making depends on referrals. Blogging is one of the best way to get referrals. After successfully creation of your blog you need to optimize it so that your blog will appear in search engine and you will get traffic to your blog which will help you get many referrals. So, lets start.
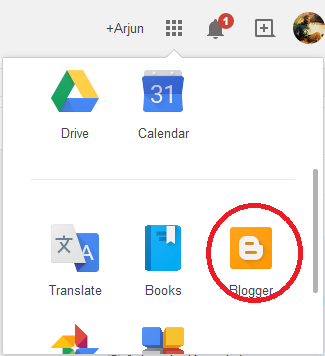
If you dont have a gmail account then create one here . After successfully create your account just log into your account. then see below. click the more tab. it will show you all the google product. Then click on blogger.
.png)
Now you will find your blogger dashboard. This is where you will create your own blog. see below
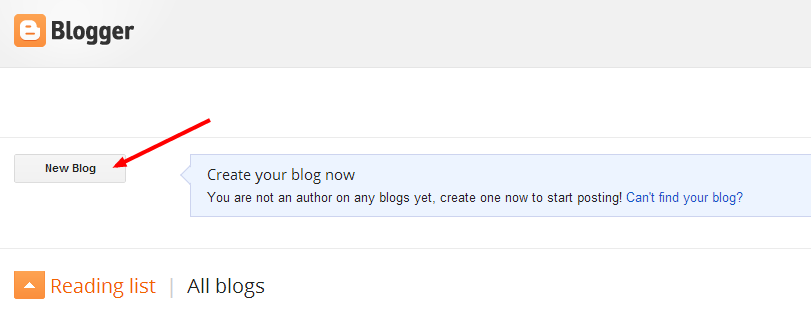
click on new blog.
once you clicked the new blog , you will find a pop up window, which will ask you title of your blog, address of your a blog means your sub domain name, and choose a template for your blog. see below
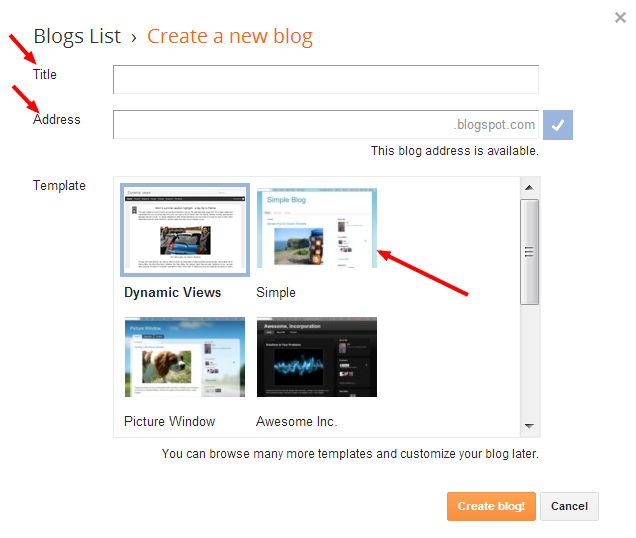
Now here three things you will be mindful about.
#1.You need a title for your blog
#2.You need a subdomain which is address
#3.And choose a template
What kind of title you have to choose?
You need to choose a title which you are going to write about. and your title must contain the keyword.
what is that keyword?
Keywords are the popular words which is used by people while they search something in search engine.for better understanding.
Suppose your blog is about ptc site then you can give a title similar to ptc site
like-" top 10 elite ptc site" which contains keyword "top, elite, ptc site"
Eg- Your title- Top 10 ptc sites
Your blog address- Top10elite ptc site or ptc review best ptc sites.
choose an address for your blog. If that address is not available then do slightly variation, like
Top10elite-ptc.blogspot.com
After you set your blog address your next step is to choose a suitable template for your blog. You can choose an available template from blogspot or you can choose a custom template. For choosing a custom template for your blog you can search it from google. In google search just type free template for blogger. You will get many free template to download. just choose an attractive template which will be suitable for your blog. Download it. After download the template, extract it's XML files and save it your notepad or wordpad. Now a days many wordpress theme which has been converted to blogger theme is available for free. You can download a free wordpress theme and upload it in your blog.
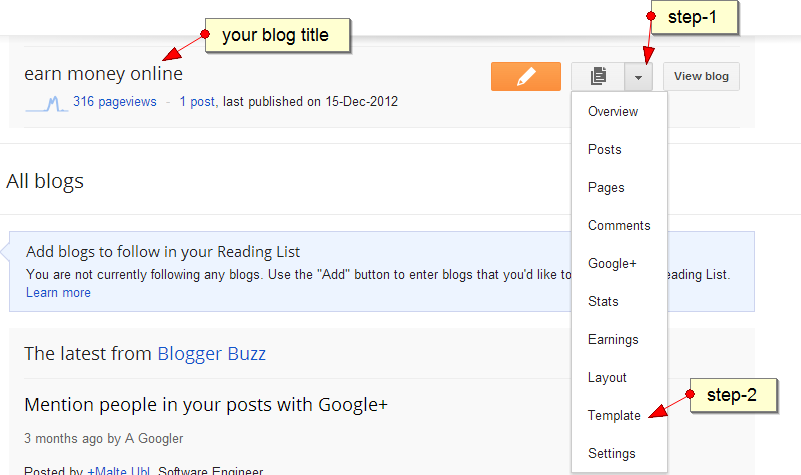
Then log into to your blogger dashboard, see below how to upload the template
what is that keyword?
Keywords are the popular words which is used by people while they search something in search engine.for better understanding.
Suppose your blog is about ptc site then you can give a title similar to ptc site
like-" top 10 elite ptc site" which contains keyword "top, elite, ptc site"
Eg- Your title- Top 10 ptc sites
Your blog address- Top10elite ptc site or ptc review best ptc sites.
choose an address for your blog. If that address is not available then do slightly variation, like
Top10elite-ptc.blogspot.com
After you set your blog address your next step is to choose a suitable template for your blog. You can choose an available template from blogspot or you can choose a custom template. For choosing a custom template for your blog you can search it from google. In google search just type free template for blogger. You will get many free template to download. just choose an attractive template which will be suitable for your blog. Download it. After download the template, extract it's XML files and save it your notepad or wordpad. Now a days many wordpress theme which has been converted to blogger theme is available for free. You can download a free wordpress theme and upload it in your blog.
Then log into to your blogger dashboard, see below how to upload the template
after clicking the template, you will find an option at the top right corner "back up/restore"
then click back up/restore to upload your xml file of the template which you have saved earlier in your notepad . The whole process will be
your blogger dashboard-->template-->backup/restore-->upload the template
Otherwise copy the xml file from your notepad, go to your blogger dashboard, click on template, then click on edit template, then delete the existing xml of your template and paste the xml which you have copied from your notepad.
Now save the template
After finishing that step, your next step will be create your post for your blog. For creating a new post , you have to click post and then click on new post. Choose a title for your post which you are going to write about and remember your post title should contain keywords. You need to choose the keyword which is searched by many people globally. so here i am going to tell you one free keyword tool which is keyword planner . This tool will help you to find the keywords. so, you need to choose the keywords which is searched by many people globally. Suppose you are searching the keywords about ptc sites , then in google keyword planner fill the word or phase with "ptc sites" and then click on search. now you will get whole bunch of keywords. Choose the keywords searched by more people global monthly averages. Pick up some keywords.
Again search for related keywords. Another keyword tool you can use for getting related keywords, which is seo centro. Seo centro has many seo tools. you can use its keyword suggestion tool. Now you just put a keyword which you picked up from google keyword tool
Suppose i got a keyword from google keyword tool which is "work from home". Now i will put that keyword in seo centro keyword suggestion tool to find out related keywords. See below
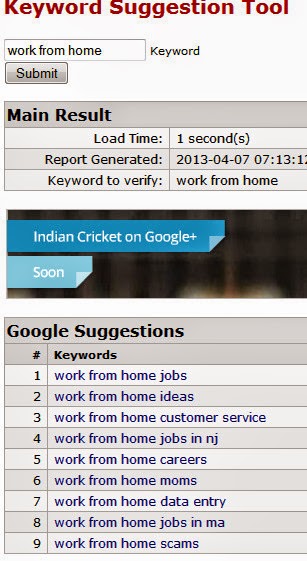
Now you got many related keywords. So pick up those keywords and start writing your post using those keywords. Your post has two sections. One is compose and another is html.
In compose you can write your post, insert a link,image and video. and in html section you can put your banner code. One thing remember, when you write your post, never try to copy from others content, if you copy others content then your blog will not get traffic because your content will be duplicate and will be penalized by google. And google DMCA has given the authority to original owner of the blog to remove your link from google and ban your account. So, create your own unique content, write it from your own.
After writing your post you can hit the publish button. Now your post has been published. Your next step will be add your site url to google webmaster tool. and add a sitemap for it.
google webmaster is the tool which let you know the indexing status of your site.
#1- Add your site url
#2-verify your ownership
In compose you can write your post, insert a link,image and video. and in html section you can put your banner code. One thing remember, when you write your post, never try to copy from others content, if you copy others content then your blog will not get traffic because your content will be duplicate and will be penalized by google. And google DMCA has given the authority to original owner of the blog to remove your link from google and ban your account. So, create your own unique content, write it from your own.
After writing your post you can hit the publish button. Now your post has been published. Your next step will be add your site url to google webmaster tool. and add a sitemap for it.
google webmaster is the tool which let you know the indexing status of your site.
There are 3 things you can do with google webmaster tools
#1- Add your site url
#2-verify your ownership
#3- submit a sitemap.
If you do that then your site will be indexed very fast by google. All these 3 steps are easy. just log into google webmaster tool. After log in, it will ask you to add your site url. then add your site url. Next step will be verify your ownership. Once you add your site url you will find an option manage your site, just right side of your blog url. click the option manage your site. Then verify your site. follow the instruction to verify your ownership in google webmaster tools. There may be 3 way to verify your ownership. but the easy way to verify your site is just copy the html code and paste it in your template head tag. After verify your site , add a sitemap
Your sitemap url will be http://abc.blogspot.com/atom.xml?redirect=false&start-index=1&max-results=500
means after your site URL just add atom.xml?redirect=false&start-index=1&max-results=500
If, you do not know how to add a sitemap , then just click on your site url in google webmaster tool. After clicking the site url in left side you will find an option crawl. Then click on crawl, next you will find an option sitemap and click that sitemap. once you click on sitemap you will find an option add sitemap which is top of the right corner in google webmaster tool.
its done
Then create a feed for your blog in feed burner and submit your feed url to rss directories.
META TAGS
META TAGS are important for search engine. Metatags contains the title, keywords, and the description of your blog. If you do not use metatags properly, it will create many duplicate title and descriptions which will cause your blog not to get more traffic and rank in google.
so here is the metatag format, you can use
<blog.pagetitle></blog.pagetitle> <blog.pagename></blog.pagename> ~ <blog.title></blog.title>
It will be placed in head tags in your template. Please follow this step. log into blogger dashboard->select template->select edit html-> select proceed. Then you will find your blog template and place this meta tag below tag.
your metatags will not be visible in your web page, but it will help search engines to understand what is your page about.
ROBOTS.TXT
Setting robots.txt is important, because this is where you will let search engine bot to index your web page. Here you are privileged to tell search engine bot which page of your blog to index and which page should not. If you don't want a particular page of your blog not to be indexed, then you can block that url in robots.txt
Even if you can block a particular search engine or directories not to index your webpage in robot text. So, if you don't use robots.txt properly then your robot will eat your blog and your blog will not be indexed by search engine bot. You can see below, the proper way to implement your robots.txt.
User-agent: GooglebotDisallow: User-agent: YahoobotDisallow: User-agent: bingbot Disallow: User-agent: MSNBotDisallow: User-agent: TechnoratibotDisallow: User-agent: *Disallow: /searchAllow: /Sitemap: http://yoursite.blogspot.com/atom.xml?redirect=false&start-index=1&max-results=500
for implementing this process log into your blogger dashboard and click on setting then click on search preference. you will find custom robot text. It will ask you enable custom robots.txt? select yes . copy the above code and paste into your custom robots.txt and never forget to replace "yoursite" with your site url
STOP GOOGLE TO REDIRECT YOUR BLOG URL TO COUNTRY SPECIFIC
after few months of creation of your blog, your blog url address will be changed. suppose your blog url abc.blogspot.com . when people from india viewing your blog, they will see your blog url "abc.blogspot.in" instead of abc.blogspot.com
similarly when people from australia visit your blog they will see your url "abc.blogspot.com.au"
for japan it will be "abc.blogspot.jp" like that it will redirect your blog url in 15 countries.
Why does google do this?
google does this because if the content of your webpage violate the law of a specific country then google will block your url not to be visible in that country. how ever your blog will be accessible in other countries
is redirection bad for your blog?
yes, it is seriously bad, as it affects your
#1- seo
#2- traffic
#3- alexa rank
#4- google rank
From my own expreience, redirection cause your blog to get less traffic, and it will affect your alexa rank
because your blog divided into 15 different url address. so every url has different alexa rank and your back links will not be same for every url.
STOP GOOGLE TO REDIRECT YOUR URL
There is a way to stop google not to redirect your blog url for country-specific. just copy the code below and paste it into your template in between head tag.
var blog = document.location.hostname;var slug = document.location.pathname;var ctld = blog.substr(blog.lastIndexOf("."));if (ctld != ".com") {var ncr = "http://" + blog.substr(0, blog.indexOf("."));ncr += ".blogspot.com/ncr" + slug;window.location.replace(ncr);}
Follow this step
Log into blogger dashboard->select template->click on edit html
Now copy the code above and paste it in below tag
Then save the template. now you are done. After you have done this, your next step will be optimize your blog in order to make your blog visible in search engine.
0 Komentar